
Adding a Contact Form in your blog is so important. But the only possible way is thorough the blog Layout page then you will need to make some undesirable modifications to make its look as if it's a part of the page away from the rest of the blog.
The following 2 steps are so simple and will show you how to add the Contact Form in a proper way to a Static Page or Post in your Blogger blog.
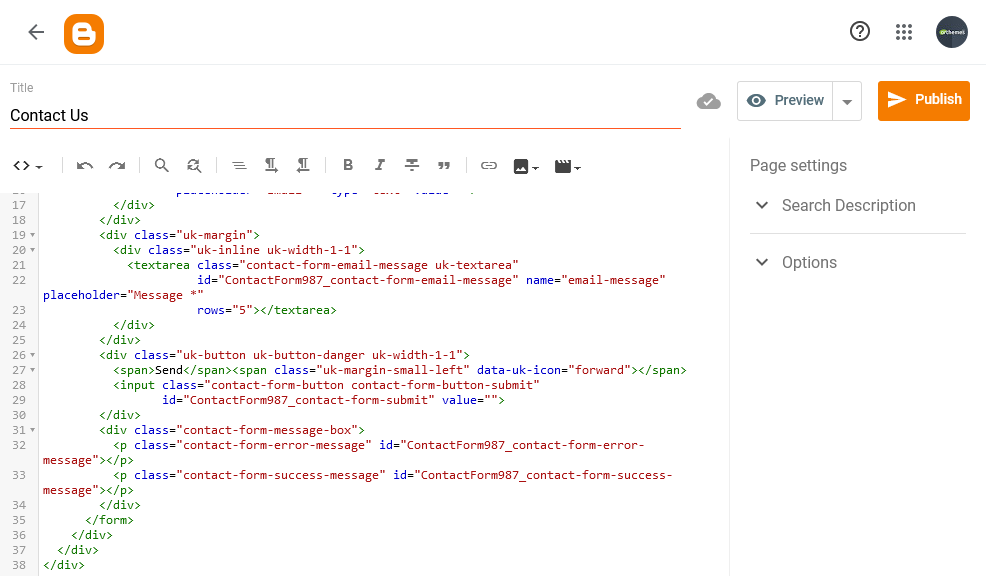
From the icon in the top left corner in the toolbox select the HTML view

Step 1: Adding The Contact Form Code
Copy the following code and paste it in your Static Page or Post HTML view.
<div id='ContactForm987' class='ContactForm'>
  <div class="contact-form-widget">
    <div class="form">
      <form name="contact-form">
        <input id="ContactForm987_contact-form-name" class="contact-form-name" name="name" placeholder="Name" type="text" value="">
        <input id="ContactForm987_contact-form-email" class="contact-form-email" name="email" placeholder="Email *" type="text" value="">
        <textarea id="ContactForm987_contact-form-email-message" class="contact-form-email-message" name="email-message" placeholder="Message *" rows="5"></textarea>
        <input id="ContactForm987_contact-form-submit" class="contact-form-button contact-form-button-submit" type="button" value="Send">
        <div class="contact-form-message-box">
          <p id="ContactForm987_contact-form-error-message" class="contact-form-error-message"></p>
          <p id="ContactForm987_contact-form-success-message" class="contact-form-success-message"></p>
        </div>
      </form>
    </div>
  </div>
</div>
For Salbuta theme users, use this code instead as it's styled to fit the Salbuta theme design style.
<div id='ContactForm987' class='ContactForm'>
  <div class="contact-form-widget">
    <div class="form">
      <form name="contact-form">
        <div class="uk-margin">
          <div class="uk-inline uk-width-1-1">
            <span class="uk-form-icon uk-form-icon-flip" data-uk-icon="user"></span>
            <input class="contact-form-name uk-input" id="ContactForm987_contact-form-name" name="name"
              placeholder="Name" type="text" value="">
          </div>
        </div>
        <div class="uk-margin">
          <div class="uk-inline uk-width-1-1">
            <span class="uk-form-icon uk-form-icon-flip" data-uk-icon="mail"></span>
            <input class="contact-form-email uk-input" id="ContactForm987_contact-form-email" name="email"
              placeholder="Email *" type="text" value="">
          </div>
        </div>
        <div class="uk-margin">
          <div class="uk-inline uk-width-1-1">
            <textarea class="contact-form-email-message uk-textarea"
              id="ContactForm987_contact-form-email-message" name="email-message" placeholder="Message *"
              rows="5"></textarea>
          </div>
        </div>
        <div class="uk-button uk-button-danger uk-width-1-1">
          <span>Send</span><span class="uk-margin-small-left" data-uk-icon="forward"></span>
          <input class="contact-form-button contact-form-button-submit"
            id="ContactForm987_contact-form-submit" value="">
        </div>
        <div class="contact-form-message-box">
          <p class="contact-form-error-message" id="ContactForm987_contact-form-error-message"></p>
          <p class="contact-form-success-message" id="ContactForm987_contact-form-success-message"></p>
        </div>
      </form>
    </div>
  </div>
</div>
You will end up with something like this.
Step 2: Adding The Contact From to Theme HTML
Add the following code in your theme HTML just before the </body> tag. This will register the contact form to the Blogger API in a proper way instead of the previously deprecated method. Then save theme HTML.
<b:section class='orthemes_contact_form' cond='false' id='orthemes_contact_form' maxwidgets='1' showaddelements='false'>
  <b:widget id='ContactForm987' locked='true' title='Contact Form' type='ContactForm' version='2' visible='true'>
    <b:includable id='main'/>
    <b:includable id='content'/>
  </b:widget>
</b:section>
You will end up with something like this.

And finally the contact form will look like this.

If you have any questions, let me know in the comments.